
Appearance
Product page
Layout
Three columns Layout
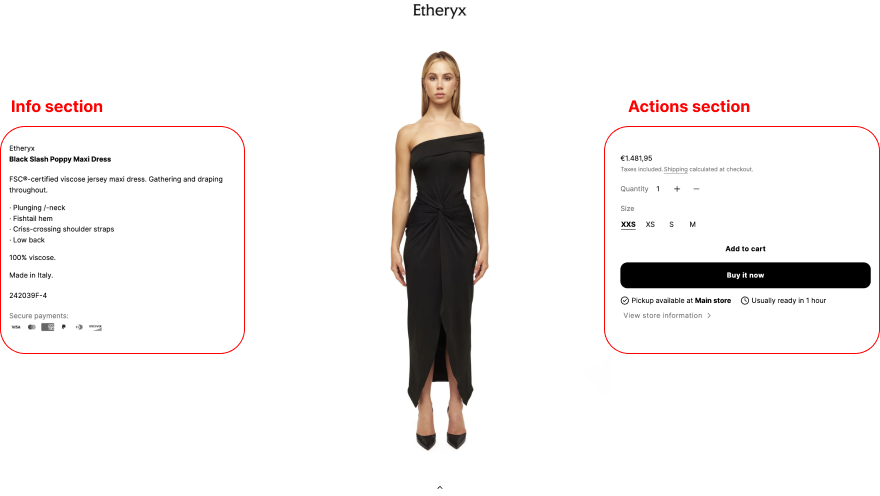
Because of it's unique design, the Three columns product page layout has few concepts that you need to understand. The product page is divided into Three columns, each with specific types of blocks:
| Area/Section | Description | Column location |
|---|---|---|
| Info | Contains blocks that provide details about the product. | LEFT |
| Media | Displays images, videos, and audio related to the product. | CENTRAL |
| Action | Includes blocks for actions customers can take, such as purchasing or saving the product. | RIGHT |
WARNING
Blocks will stay within their assigned areas. You can reorder blocks within their area, but you can’t move them to a different one.
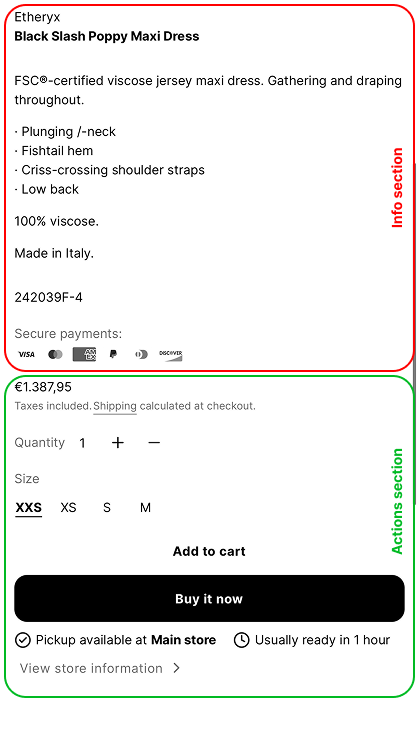
Info area blocks
| Block name | Area | Position |
|---|---|---|
| Vendor | Info | LEFT |
| Title | Info | LEFT |
| Description | Info | LEFT |
| Text | Info | LEFT |
| Sku | Info | LEFT |
| Payment icons | Info | LEFT |
| Collapsible tab | Info | LEFT |
| Rating | Info | LEFT |
| Subtitle | Info | LEFT |
| Pop-up | Info | LEFT |
| Custom Liquid - info | Info | LEFT |
Action area blocks
| Block name | Area | Position |
|---|---|---|
| Price | Actions | RIGHT |
| Inventory status | Actions | RIGHT |
| Quantity selector | Actions | RIGHT |
| Variant picker | Actions | RIGHT |
| Buy buttons | Actions | RIGHT |
| Complementary products | Actions | RIGHT |
| App - action | Actions | RIGHT |
| Custom Liquid - actions | Actions | RIGHT |
This structure ensures a clear and organized product page layout.
🖼️ Desktop view
Example of the three-column layout showing Info, Media, and Action areas
Mobile
On mobile, the layout stacks these columns in this order: Media → Info → Action. As with the desktop version you cannot move blocks between areas. For example, the price Action can’t be placed under the title Info because they belong to different areas.
🖼️ Mobile view
This is how the columns stack on mobile devices.
Two columns Coming soon
NOTE
The two columns layout is available starting v1.4.0 and later.
The Two columns product page layout is similar to the Three columns layout but without its limitations. In this layout, the Info and Actions areas are combined into a single section, allowing you to add, move, and rearrange all blocks freely. Edits apply both to the desktop and mobile versions of the product page.
Product rating
The Product rating block displays the average product rating in asterisks with the number of reviews in parentheses, for example: ***** (8)
To displaying product ratings, you need to use a product reviews app, and metafield definitions for reviews.rating_count and reviews.rating
Product vendor
NOTE
This setup is only needed if you choose the "Collection" link behavior in the vendor settings.
By default, Shopify doesn't let you add extra information, like a description or image, to vendor pages. To add this functionality, you'll need to create a custom setup using collections.
To create a brand page with both images and descriptive content:
Step ①
Go to
Products → Collections.Click Create collection
Enter your collection name.
Set the collection type to Automated.
Under Conditions, choose
Product vendor→is equal to→vendor nameAdd your desired description and image.
Scroll to the end of the page and make sure the URL handle is the same as the vendor name!
IMPORTANT
Make sure the collection URL handle exactly matches the vendor name.
⚠️ Do not use any special characters in the vendor or collection name, this is required for the setup to work.
🖼️ Screenshot
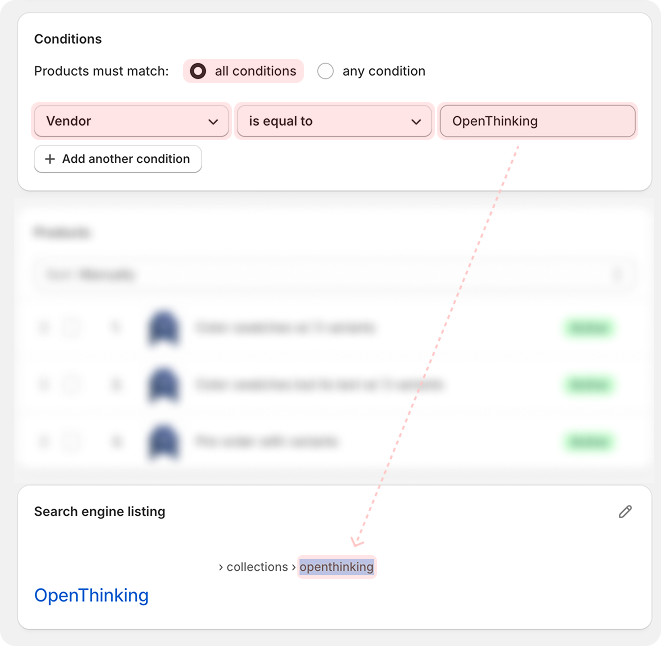
Click Save
Step ②
Activate the collection link behavior for your vendor in the product page:
- From Shopify, go to
Online Store → Themes - Click
Customizeon your current theme - In the theme editor, navigate to
Default product → Product page - In the left sidebar, under
Product information, click theVendorblock. - Under
Link behavior, select Collection - Click Save
Quick purchase tab
The Quick purchase tab appears as a floating tab on mobile when the add to cart buttons are out of view, allowing customers to quickly add products to their cart.
To activate the Quick purchase tab:
- From Shopify, go to
Online Store → Themes - Click
Customizeon your current theme - In the theme editor, navigate to
Default product → Product page - In the left sidebar, under
Product content, toggle theShow quick purchase tab - mobileoption. - Click Save
Complementary products
The Complementary products block displays complementary products that you set up with the Shopify Search & Discovery app.
NOTE
Complementary products must be In stock and set to Active, or the Shopify Search & Discovery app will automatically exclude them.
NOTE
For new stores, the Search & Discovery app may need time to index your products before they appear in the block.
Size guide
Add a size guide to your product page to help customers find the right size.
Set Up
- From Shopify admin, go to Online Store → Themes.
- Click Edit theme, then open a product template.
- Select (+) Add block, then choose Variant picker.
- Inside the Variant picker, select your Size chart page.
- Click Save
Multilingual stores
The size chart button will only appear if the product's Size option name matches the language your customer is browsing in. For example, if a customer is viewing your store in French, the Size option name must be translated into French, otherwise, the size chart won’t appear.
To set this up:
- Go to
Settings → Languagesin your Shopify admin to add and publish the languages you want to support. - Install the Translate & Adapt app or another compatible translation app.
- Use the app to localize your product content, including the variant option names.
- Make sure the
Size"Option name" is translated in every published language.
When customers browse your store in their language, the translated variant option names will be shown, ensuring the size chart button appears when expected.
External links
Dynamic Size Charts
To use different size charts for different products, you can set up Metafields. This allows each product to display a unique size chart dynamically.
Step ①
To begin, you must create a page reference metafield definition for your product pages. The product metafield links to a specific page and can be customized for each product.
- From your Shopify admin, go to Settings → Metafields and metaobjects
- In the Metafield definitions section, click Products
- Click Add definition
- In the Name field, enter Size chart
- Click ⊕ Select type
- Select Page from the drop-down menu. *One page is selected by default
- Click Save
Step ②
You need to create a page with the size chart content that the metafield references.
- From your Shopify admin, go to Online Store → Pages
- Click Add page
- In the Title field, enter Size chart, and then add the size chart information in Content.
- In the Visibility section, set the page as Visible
- Click Save
Step ③
Reference the page and apply the product template to specific products
- From your Shopify admin, go to Products.
- Click the product that you want to add a page reference to.
- In the Product metafields section, click Size chart page reference, and then click Select pages and select the Size chart page.
- In the Theme template section, select the Size chart product page template that you created.
- Click Save
Step ④
When you add a page reference to a specific product, the information from that page displays only with that product.
From Shopify admin, go to Online Store → Themes
Click Edit theme next to the theme that you want to customize.
From the Home page drop-down menu at the top of the editor, click Products → Default product, and then open the Product page section.
Locate and open the Variant picker block (as in the setup above)
NOTE
Here instead of selecting a page, click Connect dynamic source then select the metafield you created.
Next to Page, click the dynamic source icon, and then click to select the page reference metafield that you created.
Product list block
Product siblings are related products displayed as swatches on the product page. Merchants can link products as alternatives, similar to variants. Some prefer managing inventory by creating separate products for each color, ensuring each color appears as an individual product in collections.
The Product list block enables seamless switching between sibling/related products as if they are the same product. This functionality mimics a swatch variant picker, making it seem like users are selecting colors, but they are actually navigating to a separate product.
IMPORTANT
The setup of this feature is not supported by our complimentary support.
Using Metafields to Link Products
The Product list block can utilize dynamic content such as metafields to display linked sibling products. You can create a new metafield of type Product list or use an existing metafield, such as Complementary products, managed through the Shopify Search & Discovery app.
Add a Custom Product List Metafield
From your Shopify admin, go to
Settings → Custom data → Metafield definitions.Click
Products, then Add definitionHere are the fields to fill in:
- Name:
Product siblings - Namespace and key:
openthinking.product_siblings - Type select
Product→List of products
🖼️ Screenshot

- Name:
Click Save
OPTIONAL
Create a Text metafield to store the heading for the Product list block.
Assign Sibling Products to a Product
Step ①
- From your Shopify admin, go to
Products. - Select the product you want and scroll to the Product metafields section.
- Click the newly created Product siblings metafield, then Select products.
- Add all sibling products you want to display.
- Click Save
Step ②
NOTE
You will need to update the metafields for each product you want to display siblings for. You can do this by using the Bulk Editor or by updating the metafields manually.
Link the Metafield to the Product List Block
- From Shopify admin, go to
Online Store → Themes - Click Edit theme, then open the Product template.
- Select (+) Add block, then select the
Product listblock from the list. - Click Dynamic content button, then select the new
Product siblingsmetafield. - Click Save
🖼️ Screenshot

WARNING
If no products are assigned to the Product siblings metafield, the Product list block will not display. Make sure that you are viewing a product that has siblings assigned to it!!!
Pre-order
Pre-order lets you show a "Pre-order" button on product pages and product cards instead of the usual "Add to cart" button. This is useful for items that aren't available yet but will be soon.
From your Shopify admin, go to Products.
Click the product that you want to make available for preorder.
In the Tags section, type
preorder, then press Enter.WARNING
The tag must match exactly:
preorder(lower case, no spaces, no dashes).Scroll down to the Inventory section.
Check the
Continue selling when out of stockcheckbox.WARNING
If not enabled, Etheryx will show a "Sold out" button instead.
Click Save
IMPORTANT
This is a basic workaround that works for most situations. For a full-featured pre-order system, consider using a third-party app or creating a custom solution.
Also, review Shopify’s pre-order requirements to stay compliant.
FAQ
Can I move a block from the "Info" to the "Action" area & vice versa?
No. When using the Three columns layout, each block must stay in its assigned area. You can reorder blocks within their own areas, but you can't move them between areas.
Why doesn’t reordering blocks reflect on mobile?
On mobile, the Three columns layout stacks content in this order: Media → Info → Action. Just like on desktop, blocks stay within their original areas. For example, a price block (Action) can’t appear under a title block (Info) since they're in separate sections.
How do I show only images specific to the selected variant?
Shopify does not support assigning multiple images to a single variant. Because of this, Etheryx doesn't offer this feature either.
How do I link other products as clickable swatches?
Linking other products as variant swatches is supported through Shopify Combined Listings app, which is exclusively available for Shopify Plus merchants. If you have a Shopify Plus subscription, you can use this functionality right away. In alternative you can use the "Product list block".
How do I show different content per product?
You can show different content per product by using metafields. Metafields let you store custom information for each product—like care instructions, shipping rates, etc., and display that information in blocks such as the Collapsible tabs on your product page.
We have a helpful guide on this here: Using metafields with Etheryx
Why aren't videos autoplaying on mobile?
Autoplaying videos on mobile devices isn’t guaranteed. This isn’t a theme issue—it’s due to browser restrictions. Most mobile browsers disable autoplay by default to save data and improve user experience. Because of this, we don’t recommend relying on autoplay for videos on mobile.